When you're just starting out in Java development, one skill that instantly levels up your game is unit testing. But let’s face it — it can sound intimidating at first. You might be wondering:
"Do I need mocks? Repositories? Spring context?"
Nope. You don’t. Not when you’re just getting started.
In this guide, I’ll walk you through JUnit unit testing in Java using a simple example. No mocks. No Spring services. Just clean, readable, testable Java code — the kind you can understand and actually build on.
1. Introduction to Unit Testing in Java
If you write Java code, you should write unit tests. It’s as simple as that.
Unit testing helps you catch bugs early, ensures your logic works, and gives you the confidence to refactor code safely. It’s one of the most important Java development best practices, especially when you're building backend systems or microservices.
2. Why JUnit Matters for Java Developers
JUnit is the most widely used testing framework in the Java ecosystem. It’s fast, lightweight, easy to use, and integrates perfectly with tools like IntelliJ and Maven.
With just a few lines of code, you can test any Java method and validate whether your logic works — before it breaks something in production.
3. Setting Up Your Spring Boot Project in IntelliJ
Let’s get started with a quick setup using Spring Initializr inside IntelliJ.
🔧 Step-by-Step Setup:
Open IntelliJ → File → New → Project. Select Spring Initializr.
Fill in: Group: com.example
Artifact: simpledemo Click Next and add: Spring Boot Starter Test (for testing support) Click Finish.
Now your project is ready to write clean Java and test it with JUnit.
4. Creating a Simple Java Class to Test
Let’s write a basic class to simulate real business logic. Navigate to:
src/main/java/com/example/simpledemo/SomeBusiness.java
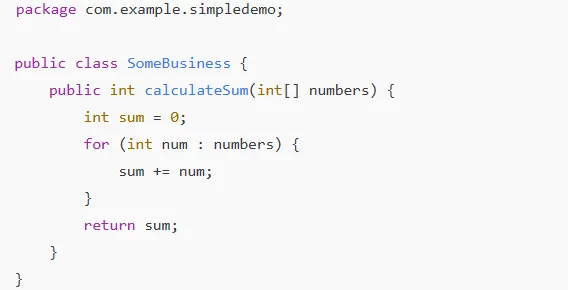
This is your logic — simple, pure Java. It represents a classic test business logic in Java scenario.
5. Understanding the Test Case Scenarios
Before writing tests, it helps to list what you’re trying to verify:
Does the sum of [1, 2, 3] return 6?
What happens when you pass an empty array? What about a single-element array? Can it handle negative numbers? Does it work with large arrays?
Before writing tests, it helps to list what you’re trying to verify:
Does the sum of [1, 2, 3] return 6? What happens when you pass an empty array? What about a single-element array? Can it handle negative numbers? Does it work with large arrays?
6. Writing Unit Tests in JUnit (No Mockito Required)
Navigate to:
src/test/java/com/example/simpledemo/SomeBusinessTest.java
And write:
Before writing tests, it helps to list what you’re trying to verify:
Does the sum of [1, 2, 3] return 6?
What happens when you pass an empty array? What about a single-element array? Can it handle negative numbers? Does it work with large arrays?
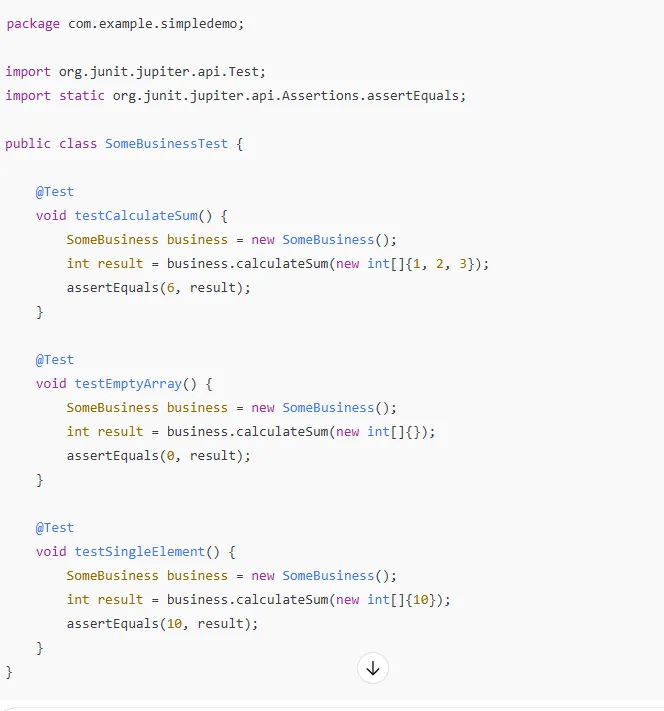
This is a perfect JUnit test case example that beginners can learn from.
7. Running and Interpreting the Results
Right-click SomeBusinessTest.java and choose Run.
If it works, you’ll see green checkmarks in IntelliJ. If something fails, IntelliJ will show which test failed and why.
8. Additional Test Scenarios
Let’s add more robustness:
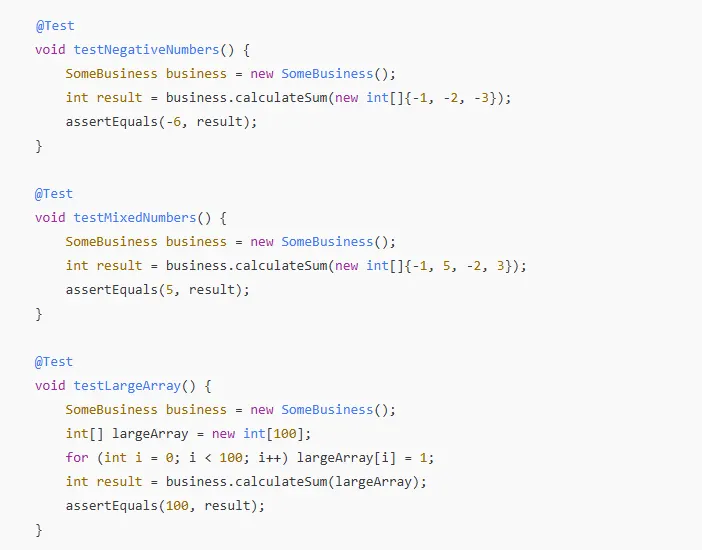
These additions improve Java testing best practices by ensuring edge cases are covered.
9. Common Mistakes and Tips for Beginners
Don’t mix concerns: Only test one method per test. Avoid hardcoding wrong expectations: Know the logic and the expected result. Keep it isolated: No need for database or network calls here. Name your test methods clearly: It makes debugging easier.
10. Final Thoughts & Next Steps
You’ve now learned how to:
Set up a JUnit testing project in IntelliJ Write clean, isolated unit tests without Mockito Handle real-world edge cases with ease
As you grow, you'll move to more complex frameworks and integrations — but your foundation of writing test cases in Java with JUnit will serve you throughout your career.
11. FAQ: JUnit Unit Testing in Java
Q1. Do I need Mockito to start unit testing? No. You can write many valuable tests without using Mockito. Start simple and add it only when needed.
Q2. What’s the difference between assertEquals and assertTrue? assertEquals compares actual vs expected. assertTrue checks a condition.
Q3. Should I write tests for every method? Focus on logic-heavy methods. Avoid testing trivial getters/setters unless they include logic.
Q4. How can I test private methods? It’s usually better to refactor code so private logic is exposed through a public method.
Q5. Can I write tests without Spring Boot? Yes. JUnit works with plain Java too. Spring Boot just makes the setup easier when you scale.